Particles to Curves
Using Python and MEL to generate geometry with particle systems
|
Maya’s particle systems are powerful and flexible tools that can be used to generate many interesting effects. Why not create a script that uses particle data to construct curves and then uses those curves as the backbone for animating extruded geometry? To create such a script I decided to use python to record the position data of every particle across a set number of frames and then construct individual curves based off the data. I also incorporated code that extrudes geometry across the curves and generates a user interface and allows the user to tweak the attributes of the extruded surfaces in an interactive manner. The UI also has the ability to keyframe extrusions so animations can quickly be generated using the tool. Below is a step by step breakdown of the entire process. Scroll to the bottom of this page to see my final results. |
|
Step 1: Get Particle Position Data
|
To attain the particle position data I created a python script called queryParticles.py. This script accepts an
endFrame, transform node, and path variables. The endFrame dictates how many frames will be queried for particle data.
The transform node, automatically named “particle”, is used to find the appropriate particle nodes within a Maya scene
so they can be queried for information. The path variable sets the location for where all the files will be written.
A directory called “particles” is automatically created where the path is designated and particle data files are created
there, each file corresponds to a single particle in the particle system. Each line of coordinate data within the particle files
represents a frame within the particle animation. |
|
Step 2: Generate Maya Curves
|
After all the particle position data is baked using queryParticles.py the information is ready to be used to create curves.
DrawCurvesMaya.py is passed a path variable which is used to find the previously baked files. The script reads each particle
file and creates an array to store the position information per particle. The array is inserted into a build curve string
padded with the proper syntax to build a nurbs curve and is evaluated by a maya command. Voila, we have curves... |
|
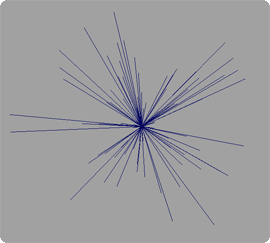
Step 3: Generate RenderMan Curves
|
As an additional challenge, I decided to create a script that generates RenderMan curves in addition to Maya curves. The script is very similar to drawCurvesMaya.py except instead of building curves in a scene it creates rib files for each curve and a master rib that is able to reference all the curve rib files that have four points of data or more. If there are less than four points of data the curves can not be generated thus they are ignored. The added choice of creating Maya curves or RenderMan curves allows the artist take
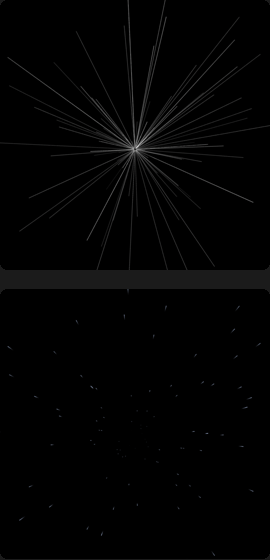
take full advantage of advanced shading techniques through using custom RenderMan shaders. Demonstrated to the right are a set of renderMan curves
with the default plastic shader applied and the same set of curves with Malcom Kesson's sparky shader applied. The spark shader can be
animated along the path of the curve creating the sparks effect. This enables a greater degree of flexibility to the particlesToCurves script. |
|
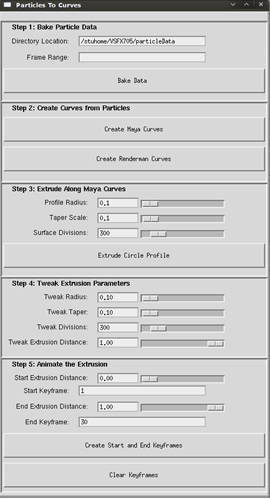
Step 4: Create a User Interface
|
The user interface is generated from a script called particlesToCurvesUI.mel. This script not only initializes the UI but also utilizes the other scripts to get particle data and draw curves. Contained within the UI script also resides the code for extruding geometry, tweaking the extruded surfaces, and animating the extrusions. The first section of the UI allows the user to set a directory location and frame range before baking the particle data. When the “Bake Data”
button is pressed queryParticles.py is called and the particle information is baked. The second section presents the user with a choice of
creating either Maya curves or RenderMan curves, each button calls drawCurveMaya.py or drawCurvesRman.py respectively. The third section has a
series of slider inputs that determine the initial settings of the extruded geometry. When the “Extrude Circle Profile” button is pressed the
extrudeCircle() procedure is called within the UI script. It creates circles at the origin of every particle, freezes their transformations, and
then extrudes geometry along the curves according the values set in the slider fields. The fourth part of the UI allows the user to tweak the
extruded geometry after its creation. As the slider values are changed procedures are called within the UI script that update the attributes of the
extruded surfaces using setAttr. The fifth section contains the key frame controls for animating the extruded surfaces. The user also has the ability to
clear all key frames within the UI. |
|
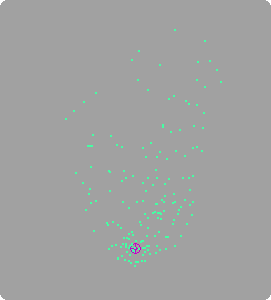
Step 5: Create Interesting Particle Systems
Now that the tool is complete we need some interesting particle systems to test it on. The first few particle systems I created were rather simple. I used combinations of air, gravity, and turbulence fields to get some interesting effects. Visible in the movie below are the curves generated from particle paths with animated geometry extrusions.
|
flash content will replace this text
|
Another demonstration of the animated geometry extrusion, this time without any curve paths displayed.
|
flash content will replace this text
|
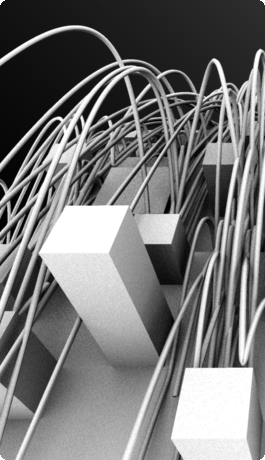
Final Particle System
I find colliding particles with geometry creates some of the more interesting curve paths to extrude on. I created a scene with some simple geometry reminiscent of a stylized city and added an emitter to bounce some particles around. Using a gravity and air field I was able to get the particles to interact in an interesting manner with the geometry I created. I like to think of my results as some evil force overtaking the once tranquil Particle City. Enjoy.
|
flash content will replace this text
|
|
flash content will replace this text
|